It's raining and miserable outside here! I had been hoping to get my hands dirty in the garden today, but I think I'll spend my day cooking and crafting (and, maybe it will clear up later for some gardening!)!
Here's a simple, little craft that's easy to do with very few resources - that's always a plus! And might take a bit more than a few minutes to do!
As a mum of young kids, I often felt like I spent more time collecting and setting up craft 'stuff' than they spent doing it!! But this craft is not like this! Set up in a couple of minutes and keep little crafters busy!
All you'll need is some paper (or light card), pencils, stapler and scissors!
Ready to get crafting?
Download the free printable below ... Colour ... Cut ... Staple
It's that easy!
Instructions are printed on the printable you can download here.
This colourful craft is based on Matthew 5:14-16, so it would be perfect for family worship, Bible class, or kids' programs at church!
Amelia Magazine Available for Subscription!
Here we come, 2017! It's going to be packed full of great, 'girly' fun, and we hope you'll join us to share in it all!
It's our second year in print and we have loads of fantastic articles, craft, activities and ideas in store for the new year!
Showing posts with label craft. Show all posts
Sunday, 15 October 2017
Thursday, 11 May 2017
Create for Mother's Day
Have you thought about Mother's Day yet? No doubt the kids at school are all onto this in their classes! But mum, have you thought about your mum? (or maybe you're a bit too old for mother's day craft at school!). A hand-made, crafted gift or special time together always means more ... so have you thought about what you're going to do or create?
So, if you're up for being a bit creative today, here's a quick little project that would add a cute touch to a special cuppa for mum.
All you'll need is a few small pieces of felt, a button, needle and thread and scissors!
So, if you're up for being a bit creative today, here's a quick little project that would add a cute touch to a special cuppa for mum.
All you'll need is a few small pieces of felt, a button, needle and thread and scissors!
1.
Take a small piece of felt and cut it so that it is 10 cm x 3 cm.
2
In the very centre, cut a vertical ‘slit’ 1 ½ cm long.
3.
Cut a flower out of another scrap of felt. To make this easier to cut, first cut out a pattern for the flower and then tape it on to the felt. Cut through the sticky tape around the edge of the template.
4.
Stitch (or glue) the flower on to the tag cover right near the end. If you’re stitching, make sure the stitching is on the edge of the flower only.
5.
Cut a ‘buttonhole’ out of the centre of the flower – just a horizontal ‘slit’.
6.
Stitch a button on the bottom inside of the other end of the felt strip.
7.
To use, curl the tag of the tea bag enough to fit through the centre ‘slit,’ fold the cover over the tag, and pull the button through the ‘buttonhole’.
And there you go, you have a cute little tag for your tea bag!
Now all you need to do is make that cup of tea!
Friday, 5 May 2017
Cutlery Pocket
This has got to be one of my favourite 'to-dos' in our current issue! I just had to share it! Pop a little creativity into your day with this quick project!
Such a simple and cute way to lay out a special, girly picnic! Pop your cutlery for each guest inside each pocket. Maybe even add a flower or a little card!
Make it easy and just use hot glue or clear drying craft glue (hot glue is much better for those who are keen to get on with the project!) or practice your hand-sewing skills and use a running stitch instead of glue.
You'll need:
back pocket from an old pair of jeans
scissors
pencil
glue - hot glue or clear craft glue (or needle and thread)
lace
ribbon
buttons
Cut the back pocket out of the jeans (keep the back fabric on it)
Trim the back fabric close to the edge of the pocket to neaten it up
Fold the pocket in half and mark the centre line on the back of the pocket
Use glue to attach pocket sides down the centre line (or stitch instead of glue)
Decorate the pocket by wrapping lace and/or ribbon around it. Anchor with glue or stitching
Attach buttons
Now, all there is to do - place a spoon, knife and fork in the pocket and head off for a picnic!!
PS You'll find this in Issue 12, available here
Happy crafting and being creative!
Thursday, 12 January 2017
Easy 3-step lace painted bottle
This is actually bit of a sneak-peak into our next issue! I wanted to do these as a prop for an upcoming photo shoot for our first issue for 2017. The weather has been super hot here, but today it was a little cooler, so my young PA (my little miss!) and I got outside this afternoon and had fun making a bunch of these! In fact, she made more of them than I did! We loved being able to be outside doing something crafty together.
In just 3 simple steps, you can have these decorating your room, window, even trees!
1 Hang an empty, clean bottle outside - we hung ours from the swing set! (we just used a glass soft drink bottle)
2 Tape a strip of lace around the bottle. The bigger the holes in the lace, the more paint will end up on your bottle.
3 Spray paint over the lace - not too close, and thin layers at a time so you don't end up with thick paint that wants to drip. We just used a plain white gloss spray paint.
When the paint is dry (which on a day like today, didn't take long!), carefully remove the lace.
If you need to pack them up for storage at all, wrap them up in white tissue paper or an old cloth, as the paint can scratch off.
When you get your next issue, you'll be able to play 'I spy' and see if you can find where we used them!
In just 3 simple steps, you can have these decorating your room, window, even trees!
1 Hang an empty, clean bottle outside - we hung ours from the swing set! (we just used a glass soft drink bottle)
2 Tape a strip of lace around the bottle. The bigger the holes in the lace, the more paint will end up on your bottle.
3 Spray paint over the lace - not too close, and thin layers at a time so you don't end up with thick paint that wants to drip. We just used a plain white gloss spray paint.
When the paint is dry (which on a day like today, didn't take long!), carefully remove the lace.
If you need to pack them up for storage at all, wrap them up in white tissue paper or an old cloth, as the paint can scratch off.
When you get your next issue, you'll be able to play 'I spy' and see if you can find where we used them!
Saturday, 8 October 2016
A sticky craft!
I know, it sounds like the start of a ‘Dad-joke’, but I
couldn’t help myself! I had so much fun making some of the 'props' used in our current issue (Spring 2016), that I just had to share how to do them yourself. Here's the first of a few to come!
Sticks and branches can add interest to any room, especially ones that are painted or covered in fabric. Maybe even having extra bits added to them like flowers or leaves, can add an extra touch. Don’t you just love that earthy touch to a room, but like it to look clean and fresh?
Covering a stick with fabric is very easy.
First, pick what fabrics you want to use. Cotton, woven
fabrics work best, and they offer a wide range of prints and colour. Choose
colours/prints that coordinate well together.
Cut the fabric into strips 2.5 cm wide. They can be a little
awkward to use if they are too long (they start to tangle up as you wrap!), so
keep them short – no more than about 30-40 cm long.
Begin by dotting the stick with a little hot glue and
placing one end of the fabric over the dot, so the fabric will start to wrap on
an angle.
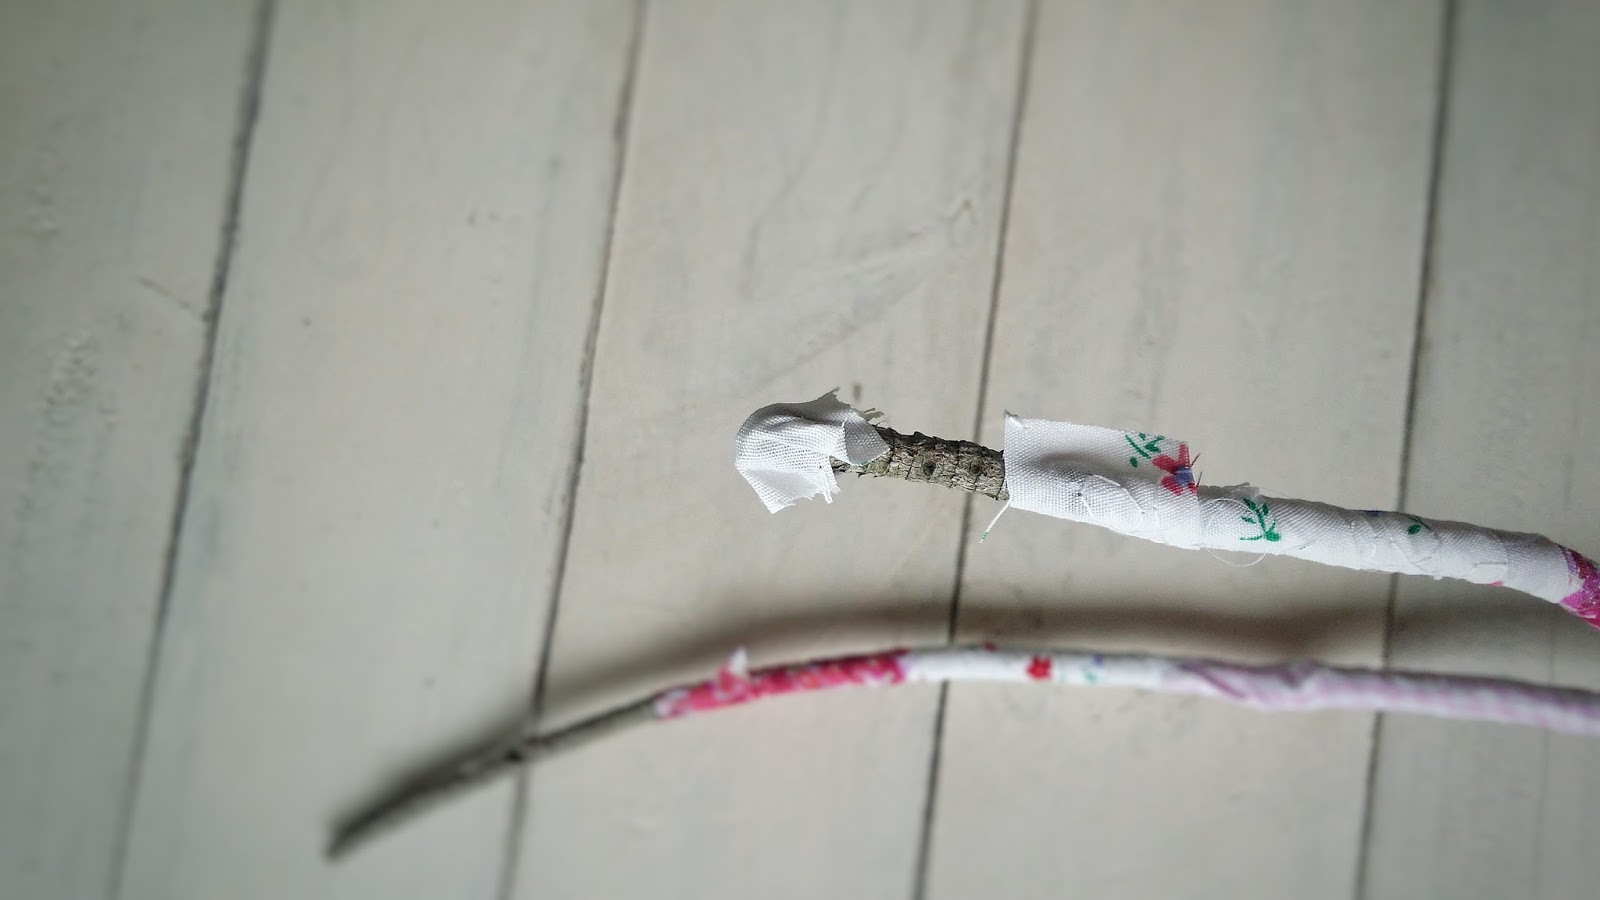
Wrap the fabric around the stick, dotting with glue every wrap or two. Overlap the fabric strip about half-way over the previous wrap, so that there is good coverage of the stick and your print/colours show up well.
If you come to a join in the branches, you may need to be a little creative in wrapping to cover all of the stick in fabric.
Keep wrapping until you come nearly to the end of a branch.
Cut a short strip of fabric (in the same fabric the outer edge of the branch is
covered in), cover the end of the branch with hot glue, and glue the short strip
over the end of the branch.
Finish wrapping the branch in fabric and snip off any excess fabric, making sure it is glued down well.
Cover all of the branch/stick with fabric.
To anchor it, attach it to a wall, or if you want it to be
more free-standing, place it in a jar filled with pebbles or rice (if the jar
is tall and deep, you may need to place the branch in first, then add the
pebbles).
You could use your branch to hang things off of, to leave
notes on, or to just look pretty in your room!
PS - and if you're young, just remember to be very careful with hot glue, and ask an adult to keep an eye on you while you use it!
Wednesday, 29 June 2016
Girly time with the sisterhood of family
Do you have any plans for the holidays yet? Some of my kids are happy to just veg out at home, while there are those who want to be 'doing'! And a mix of both can be great for holidays, especially these shorter ones in the cooler months. I'll admit, I'm a 'do-er', so even a day puddling around at home is spent repainting furniture, organising a cupboard long left to cluttering, sewing or gardening. These are great opportunities to spend time with your kids. And of course, there's cousins to come over and play with (we are blessed to have so many that live close by)!
Our family has a wonderful annual tradition that connects the women/girls of the family. Every year we head off to the big Craft and Quilt Fair in Sydney. It's a beautiful mix of generations - grandma, aunt, nieces, cousins and even a 'baby' cousin this year! Our girls have been going with us since they were babies, and this year, they were just at the age (nearly 11 years old) where it was a day they seemed to have grown into. The interactions between the younger girls and the older women were something special to be a part of. We saw our girls acting as caregiver and babysitter to a younger cousin, they were inspired by the various crafts and skills they saw demonstrated (and got to have a go at), chats over lunch and a morning cuppa, the long train ride there and back home ... I walked away feeling like it had been a day where relationships were deepened, not just a day of inspiration!
So, what was so great about all of that?
1 Deepening relationships - After reading Steve Biddulph's facebook post from 24 May 2014, I was reminded that my role as an aunt is very important. Here he noted two main factors in the deterioration of young girls' mental health were the over-sexualisation girls are bombarded with, and the disappearance of adult women in their lives. Today's girls spend 80% LESS time with older women in their families, than previous generations!! Do you remember all the time you spent with your aunt, grandma, older cousins? I do! And I look back at those with great fondness, and the women who spent that time with me, are still significant in my life today! I want that for my daughter, and my nieces! In fact, I'd decided that these holidays, despite all I felt I needed to do to catch up on life, I would make an effort to do more 'auntie' stuff. My nephews are having a sleep over. Of course, there was the craft fair, too.
2 Sharing time over the skills you enjoy - Out of the craft fair, grew something I wasn't expecting. I've done sewing with nieces before. I spend time doing crafty things with my daughter. But, at the craft fair, I realised how important it was to the little girls, that I was interested in sharing my skills and passions with them. We saw beautiful handbags all through the craft fair, so I suggested that we buy a few small treasures, and then spend a day making a bag each during the holidays. The following day my niece asked her mum if she could have the day off school to come to my place to sew her bag! Do you have skills or passions you could share with a niece or young girl in your life? It may seem even mundane to you, but the sheer fact of taking time out to be with them speaks volumes of the value you place on them being part of your life. And one thing I've found as a Home Ec teacher, is that kids open up and share while their hands are quietly busy. This is a chance to discuss those really important life topics, and you'd be surprised at how easily it is the children who open up these conversations when they are quietly working by your side!
3 Glimpses into the inner beauty of your girls - I loved watching my daughter and niece throughout the day. How often do we get a chance to just be observers of our children? My heart was warmed to see their manners in action, their kindness and generosity with each other and with their young cousin, their excitement and enthusiasm over simple things (cute dolls, crafts they'd like to try, even the jellyfish they saw in the harbour as we walked past!), their imaginations ticking away as to the possibilities they could see (along with that attitude of - 'I can do it'). And to not just see these, but to speak to the girls about how I loved seeing their inner beauty.
So, what might you do these holidays to spend time with the young girls in your life?
Here are some ideas:
Do you have any other great ideas? You might even want to plan ahead for some of them, so you're not distracted by washing that needs doing, or rooms that need tidying! We hope your holidays are full of wonderful connectedness with the women in your family and social network!
Our family has a wonderful annual tradition that connects the women/girls of the family. Every year we head off to the big Craft and Quilt Fair in Sydney. It's a beautiful mix of generations - grandma, aunt, nieces, cousins and even a 'baby' cousin this year! Our girls have been going with us since they were babies, and this year, they were just at the age (nearly 11 years old) where it was a day they seemed to have grown into. The interactions between the younger girls and the older women were something special to be a part of. We saw our girls acting as caregiver and babysitter to a younger cousin, they were inspired by the various crafts and skills they saw demonstrated (and got to have a go at), chats over lunch and a morning cuppa, the long train ride there and back home ... I walked away feeling like it had been a day where relationships were deepened, not just a day of inspiration!
So, what was so great about all of that?
1 Deepening relationships - After reading Steve Biddulph's facebook post from 24 May 2014, I was reminded that my role as an aunt is very important. Here he noted two main factors in the deterioration of young girls' mental health were the over-sexualisation girls are bombarded with, and the disappearance of adult women in their lives. Today's girls spend 80% LESS time with older women in their families, than previous generations!! Do you remember all the time you spent with your aunt, grandma, older cousins? I do! And I look back at those with great fondness, and the women who spent that time with me, are still significant in my life today! I want that for my daughter, and my nieces! In fact, I'd decided that these holidays, despite all I felt I needed to do to catch up on life, I would make an effort to do more 'auntie' stuff. My nephews are having a sleep over. Of course, there was the craft fair, too.
2 Sharing time over the skills you enjoy - Out of the craft fair, grew something I wasn't expecting. I've done sewing with nieces before. I spend time doing crafty things with my daughter. But, at the craft fair, I realised how important it was to the little girls, that I was interested in sharing my skills and passions with them. We saw beautiful handbags all through the craft fair, so I suggested that we buy a few small treasures, and then spend a day making a bag each during the holidays. The following day my niece asked her mum if she could have the day off school to come to my place to sew her bag! Do you have skills or passions you could share with a niece or young girl in your life? It may seem even mundane to you, but the sheer fact of taking time out to be with them speaks volumes of the value you place on them being part of your life. And one thing I've found as a Home Ec teacher, is that kids open up and share while their hands are quietly busy. This is a chance to discuss those really important life topics, and you'd be surprised at how easily it is the children who open up these conversations when they are quietly working by your side!
3 Glimpses into the inner beauty of your girls - I loved watching my daughter and niece throughout the day. How often do we get a chance to just be observers of our children? My heart was warmed to see their manners in action, their kindness and generosity with each other and with their young cousin, their excitement and enthusiasm over simple things (cute dolls, crafts they'd like to try, even the jellyfish they saw in the harbour as we walked past!), their imaginations ticking away as to the possibilities they could see (along with that attitude of - 'I can do it'). And to not just see these, but to speak to the girls about how I loved seeing their inner beauty.
So, what might you do these holidays to spend time with the young girls in your life?
Here are some ideas:
- Visit a local historical house - great opportunities to look at beautiful china, dresses, old-fashioned anything! And, chat about what it was like being a girl growing up back then, how it is different now ..
- Bake at home - go through recipe books together and pick out your baking (and it could even be part of the fun, to go to the shops for any special ingredients that might be needed), and spend a day inside baking.
- Window shop at your local handcraft markets, or a 'funky' mall - enjoy the moments of dreaming together of what you'd like to buy, the inspiration you have of how you could decorate your room, or even ideas of what you could go home and make!
- Do an op-shop crawl - set a budget - it might only be a few dollars each, and see what treasures you can find at a few different op-shops.
- Take a train trip or a ferry ride - not just to get to a destination, but for that to be the main purpose of the trip! On a cold winter's day, it can be fun to rug up and be outside. You could even stop at a café at the other end for a hot cuppa, before making your way back home. There's bound to be interesting sights and quiet moments for conversation. In NSW with the Family Sunday Funday train tickets, this can be reasonably cheap, and a great option for the whole family to be a part of!
Do you have any other great ideas? You might even want to plan ahead for some of them, so you're not distracted by washing that needs doing, or rooms that need tidying! We hope your holidays are full of wonderful connectedness with the women in your family and social network!
Thursday, 4 February 2016
Crowning Glory
What is your 'crowning glory'? We often think of our hair. But, it is also something that is important or a priority. For you, is it your intelligence, athletic ability, beauty? Or, is it that you are the daughter of a king - God. Think of yourself as a daughter of God, and does that change how you think about who you are, or how you think about those around you?
We took on this theme in our Summer issue and really enjoyed putting together these 'crowns' for a little princess! They're so cute, I wonder if I could get away with wearing one out and about!
Friday, 3 October 2014
Make a wooden spoon doll!
A wooden spoon doll is so easy to make and offers a chance to
spend time together with mum (or grandma or a special aunt) – and she might even want to make one with you, too! Why not ask her about the special dolls she had growing up while you are making a wooden spoon doll? And afterwards, she might even bring one of her special dolls out for you to have a look (I think most mums, grandmas and aunts still have at least one doll tucked away in a cupboard - or at least a photo of them playing with one!).
You will also need:
Let's get started!
- Sandpaper - fine grade
- Acrylic paint
- Paintbrush
- Jar of water for rinsing brushes
- Plate etc to mix paint on
- Newspaper to protect the table
- Pencil
- Fine tip marker in black and red
- Eraser
- Doily, hankie, serviette, fabric scraps etc for a dress
- Ribbon, lace, buttons
- Glue
- Needle and thread
Let's get started!
- Using some fine grade sandpaper, give the spoon a little rub to smooth the surface (that will make her nicer to play with).
- Set up to do some painting: get a jar of water ready, something to mix paint on (an old plastic lid is good for this) and cover the table with newspaper.
- Mix some acrylic paint to make a skin colour - sometimes you can buy a skin coloured paint. Paint the front of the spoon, let it dry, then turn it over and paint the back of the spoon (that way you make sure you don't accidentally ruin her face because the paint hasn't quite dried properly!).
- When the paint is dry, you are now ready to make her face. To make it easier, you can download a face template here.
- If you use the template, print it off, trace it onto greaseproof paper using a lead pencil, then place the greaseproof paper template face down onto the wooden spoon and trace over again. This should transfer the template to your wooden spoon.
- Otherwise, just use a pencil to mark out her face on your wooden spoon.
- Use a fine-tipped marker to outline her hair and facial features (eyes, mouth, cheeks), rub out the pencil lines and then fill them in with paint or marker. The smaller sections will be easier to do with a marker.
- From your selection of doilies, hankies, fabric scraps and so on, decide on what her clothes will be made from. We made a dress out of an old doily and then a little 'apron' dress over the top out of the corner of a piece of embroidered linen.
- To make the dress, cut a circle out of the centre of the doily.
- Thread a needle with some thread and stitch a running stitch all around the edge of the circle.
- When you get back to where you started, place your wooden spoon doll inside the hole, draw up both ends (starting and finishing) of the thread, and tie a knot or bow to secure it.
- Repeat for the 'apron' dress or anything else you want to put over the top of her dress.
- Or, attach some ribbon or lace with a small stitch or some glue, wrap the lace/ribbon back around to the front and stitch or glue it in place. We stitched around the top of the 'apron' dress just so it could hold up to being transported to workshops and being played with!
- Finish off with pieces of lace or a button, either glued or stitched in place at the front.
Now, have fun playing with your brand new doll!
Extra tips:
- Create dolls that represent girls from different nationalities - start with a more local area
- Make a wooden spoon doll to ‘replace’ an old doll you have chosen to give to a charity
- Just for mums and 'big people': there is value in a young girl making a doll herself. The doll she makes might represent the feelings she has at the time, it might be a reflection of one of her role-models, and she is able to develop some drawing and fine motor skills at the same time!
Thursday, 3 July 2014
How well can you keep your craft tidy and organised?
It's
so nice being able to do craft when you want to and enjoy having time to
be creative, isn't it? While it's wonderful to enjoy this, there is
some responsibility that goes along with it.
Your mum really doesn't need extra work in cleaning up after you do craft. Keeping your craft area organised, putting things away when you have finished and leaving it clean are so helpful and really show you can be responsible, organised and show initiative.
The little servant girl in Naaman's house must have been very responsible, organised, clean and tidy, as she was listened to by Captain Naaman. What she did around the house must have been part of her showing God's love to Naaman and his family.
Why don't you try showing God's love in your home today by being helpful and responsible?
(If you'd like to read more about the servant girl, have a look in a bible in 2 Kings 5:1-27)
Your mum really doesn't need extra work in cleaning up after you do craft. Keeping your craft area organised, putting things away when you have finished and leaving it clean are so helpful and really show you can be responsible, organised and show initiative.
The little servant girl in Naaman's house must have been very responsible, organised, clean and tidy, as she was listened to by Captain Naaman. What she did around the house must have been part of her showing God's love to Naaman and his family.
Why don't you try showing God's love in your home today by being helpful and responsible?
(If you'd like to read more about the servant girl, have a look in a bible in 2 Kings 5:1-27)
Wednesday, 11 June 2014
Get organising your craft!
It's coming up close to holidays here. Do you have something special planned for your holidays? Our holidays, amongst other things, inevitably end up with some sort of major bedroom clean-up, and of course, some craft! Do your craft supplies need some organising? Here are some tips and a free printable to help you get ready to do lots of craft, hassle-free, during the holidays!
Grab mum and get her to give you a hand. Mum's are really good at giving advice on how to store things, what things to keep or throw out, or just to label containers. It's also a great chance to have some time just with mum. I'm sure it will make mum really happy to see you taking some responsibility with keeping your things tidy and organised! (there's a little card on the printable sheet, mum, that you can give your young girl as a thank you for her hard work!)
Well done! Stand back at look at all you've achieved! Give mum a great, big hug and thank her for helping you. Take a moment to be proud of yourself and give yourself a pat on the back! Now you can do craft to your heart's content (when you're allowed to, of course!) and know where everything is and it will be easy to use (but, remember to pack it away in its right place when you're finished)!
Click here to download your free printable!
Grab mum and get her to give you a hand. Mum's are really good at giving advice on how to store things, what things to keep or throw out, or just to label containers. It's also a great chance to have some time just with mum. I'm sure it will make mum really happy to see you taking some responsibility with keeping your things tidy and organised! (there's a little card on the printable sheet, mum, that you can give your young girl as a thank you for her hard work!)
- Find or buy some boxes, recycled tin cans, pencil cases or trays that you could use to store your craft things in
- Make sure your bedroom is tidy to start with, because you will need some clear, tidy space to spread out on!
- Take out all of your craft things, and set up the storage boxes and containers on the floor so they are easy to get to, and have a rubbish bin or plastic bag close by to put rubbish in
- Print off the free printable, cut out the labels and attach them to the appropriate storage containers. You could laminate them or print on cardboard so they are more durable. Try attaching them with pegs, or sticky tape and ribbon, or even blu-tac (if you think you might change your mind!)
- Start sorting through your craft items - check that textas work (if they don't throw them out), if you have craft things that are too 'young' for you, are ruined, or you don't think you'll ever use them, throw them out or set them aside to give away to a friend or the local charity organisation
- As you sort, put things in the new storage containers
- When you've done that, find a place to put your storage containers. You might like them out on a desk or shelf so you can easily use them, or you might prefer to put them on shelves in a cupboard so you don't have too much clutter!
Well done! Stand back at look at all you've achieved! Give mum a great, big hug and thank her for helping you. Take a moment to be proud of yourself and give yourself a pat on the back! Now you can do craft to your heart's content (when you're allowed to, of course!) and know where everything is and it will be easy to use (but, remember to pack it away in its right place when you're finished)!
Click here to download your free printable!
Friday, 7 February 2014
Upcycle a silver tray!
If you'd like to have a go at turning an old tray into something that you can still use, have a go at this! This is the magnetic board made from an old silver tray I didn't have the heart to cover up completely!
To make this, you'll need:
To make the fabric cover, first choose a fabric that will not be too distracting to the intricacy of the tray.
Now your tray is cleaned up, shiny and covered, it's ready to hang!
To make this, you'll need:
- Bi-carb Soda
- Vinegar
- Cleaning cloth
- Tailor's chalk or temporary fabric marker
- Fabric to cover the tray
- Pinking shears
- Double-sided tape
- Ribbon
- Place a few spoonfuls of bi-carb soda on the tray, along with a little vinegar.
- Rub the cleaning cloth into the bi-carb soda and vinegar and then rub the tray.
- Get into all the little grooves, and rub hard in the stubborn spots.
- Rinse the tray under running water and dry it thoroughly.
To make the fabric cover, first choose a fabric that will not be too distracting to the intricacy of the tray.
- Make sure your fabric is well ironed.
- Place it on top of the tray and mark a line around the edges where the base of the tray begins to be flat.
- Cut the fabric out, along the marked line, with pinking shears.
- Turn the fabric piece over, and lay down lines of double-sided tissue tape, close to the edges, as well as lines through the middle.
- Peel off the back of the double-sided tape, and very carefully stick to the base of the tray.
Now your tray is cleaned up, shiny and covered, it's ready to hang!
- Thread some ribbon through a handle and tie the ends together in a bow.
- Hang your new magnetic board from a hook, at a height that will be easy to get to!
- I've used some fairly strong magnets (which I purchased from 'kikki' - aren't they cute?!).
Subscribe to:
Posts (Atom)