Amelia Magazine Available for Subscription!

Here we come, 2017! It's going to be packed full of great, 'girly' fun, and we hope you'll join us to share in it all!

It's our second year in print and we have loads of fantastic articles, craft, activities and ideas in store for the new year!


Sunday, 15 October 2017

Picture chinese lantern

It's raining and miserable outside here! I had been hoping to get my hands dirty in the garden today, but I think I'll spend my day cooking and crafting (and, maybe it will clear up later for some gardening!)!

Here's a simple, little craft that's easy to do with very few resources - that's always a plus! And might take a bit more than a few minutes to do!


As a mum of young kids, I often felt like I spent more time collecting and setting up craft 'stuff' than they spent doing it!! But this craft is not like this! Set up in a couple of minutes and keep little crafters busy!

All you'll need is some paper (or light card), pencils, stapler and scissors!

Ready to get crafting?

Download the free printable below ... Colour ... Cut ... Staple

It's that easy!

Instructions are printed on the printable you can download here.

This colourful craft is based on Matthew 5:14-16, so it would be perfect for family worship, Bible class, or kids' programs at church!

Thursday, 11 May 2017

Create for Mother's Day

Have you thought about Mother's Day yet? No doubt the kids at school are all onto this in their classes! But mum, have you thought about your mum? (or maybe you're a bit too old for mother's day craft at school!). A hand-made, crafted gift or special time together always means more ... so have you thought about what you're going to do or create?

So, if you're up for being a bit creative today, here's a quick little project that would add a cute touch to a special cuppa for mum.

All you'll need is a few small pieces of felt, a button, needle and thread and scissors!


1.
Take a small piece of felt and cut it so that it is 10 cm x 3 cm.
2
In the very centre, cut a vertical ‘slit’ 1 ½ cm long.
3.
Cut a flower out of another scrap of felt. To make this easier to cut, first cut out a pattern for the flower and then tape it on to the felt. Cut through the sticky tape around the edge of the template.
4.
Stitch (or glue) the flower on to the tag cover right near the end. If you’re stitching, make sure the stitching is on the edge of the flower only.
5.
Cut a ‘buttonhole’ out of the centre of the  flower – just a horizontal ‘slit’.
6.
Stitch a button on the bottom inside of the  other end of the felt strip.
7.
To use, curl the tag of the tea bag enough to fit through the centre ‘slit,’ fold the cover over the tag, and pull the button through the ‘buttonhole’.

And there you go, you have a cute little tag for your tea bag!

Now all you need to do is make that cup of tea!


Friday, 5 May 2017

Cutlery Pocket

This has got to be one of my favourite 'to-dos' in our current issue! I just had to share it! Pop a little creativity into your day with this quick project!


Such a simple and cute way to lay out a special, girly picnic! Pop your cutlery for each guest inside each pocket. Maybe even add a flower or a little card!

Make it easy and just use hot glue or clear drying craft glue (hot glue is much better for those who are keen to get on with the project!) or practice your hand-sewing skills and use a running stitch instead of glue.


You'll need: 
back pocket from an old pair of jeans
scissors
pencil
glue - hot glue or clear craft glue (or needle and thread)
lace
ribbon
buttons

Cut the back pocket out of the jeans (keep the back fabric on it)
Trim the back fabric close to the edge of the pocket to neaten it up
Fold the pocket in half and mark the centre line on the back of the pocket
Use glue to attach pocket sides down the centre line (or stitch instead of glue)
Decorate the pocket by wrapping lace and/or ribbon around it. Anchor with glue or stitching
Attach buttons

Now, all there is to do - place a spoon, knife and fork in the pocket and head off for a picnic!!

PS You'll find this in Issue 12, available here

Happy crafting and being creative!

Thursday, 27 April 2017

6 Benefits of Developing Creativity


You’ll find loads of blogs, pins, posts and infographics about how to keep your creativity on a roll. Just one short search in the internet sea, and you’ll haul in a huge catch.

So, why? Why are we so interested in creativity?

Is it really that important that we develop creativity?


I say, YES!! And have done for many years now. As adults we benefit immensely from using our creativity, and kids need to use theirs, too. All too easily, creativity is dampened by the way we experience childhood. Having to colour within the lines, instructions that the ‘sky must be blue and the trees green’, and hearing ‘this is the way it should be done’…. while these have their place, they can impact (squash!) our creativity. There are benefits to developing our creativity, not just for adults, but for fostering that innate, born-with creativity children have.


CONNECT WITH GOD

All of us are creative. We are created in the image of a Creator God, so this shouldn’t surprise us. And that is one of the greatest benefits of developing creativity! When we use our creativity, we connect with God. I recall hearing an interview with a ‘creative’ years ago (have no idea now who it was – a writer or musician or such), and I was amazed that they openly said their most profound creative moments, came from ‘something’ outside of themselves. And when that creativity is good and pure and true, it is our expression of what God whispers in our hearts. Perhaps, we also reflect God’s character when we use our creativity? I love the way Max Lucado puts it - ‘In fact, we are much like God when we dream.’


FIND YOUR VOICE

The ability to express ourselves, to communicate our thoughts, feelings and ideas, is a basic need for everyone. Using our creativity gives us a broader canvas on which to paint our voice – we might express with language, music, art, handcrafts, photography, play-dough sculptures, tree-house building … (the list goes on – you get the idea!) In expressing ourselves, we start to find out who we really are and share ourselves with the world (and the world is all the more richer for it!).


HANG ON TO CHILDHOOD

Being creative gives permission for the freedom of your inner child. My mother, for many years, has spoken (and practiced well!), about letting out your inner child. It allows you to dance in the rain, giggle over bubbles, and snuggle a teddy bear. And when it comes to creativity, it allows your inner child to come out and be curious about the possibilities, to make a bolder stroke with your brush, to play with new materials and enjoy it for ‘plays sake’.


STEP INTO SOMEONE ELSE’S SHOES

Looking at the world with a creative mindset helps us to see things in a different way – we can see things from a different perspective. We see possibilities, the ‘what might be’s’ and the brighter futures. Not only that, but you can imagine what it might be like to step into someone else’s shoes. We develop empathy and compassion for others because we can imagine what life might be like for someone else.


GROW COURAGE AND BE BRAVE IN OUR 'UNSUCCESS'

It takes courage to express yourself creatively. You open up the vulnerable parts of your soul, and it can be risky exposing that to the world around you. Using our creativity gives opportunities for rehearsing, developing and strengthening bravery. Not all creative expressions turn out the way we plan. All too often we see our creative endeavours as failures (eg when they don’t live up to what we dreamed they would be like). And so we learn to deal with what we perceive as unsuccess – we grow strategies for bouncing back, coping with constructive criticism or even knowing when to quit and start over again!


FIND YOURSELF

You are unique! If you were to not use your creativity, the world would miss out on the beautiful way you create, make things new, or bring art, life, love and self-expression into this world! Expressing our creativity develops our unique qualities, so we are not all the same. God loves variety and He created us all unique.


You were made to be creative. Go on … grow, free your soul, add your unique ‘colour’ to the world and make it a better place.


PS - I realise this probably seems out of place at this stage! For two months now, I’ve decided to be more serious about our blog and facebook. I’ve started on a number of articles and themes, and not done anything with it. They’re on the back shelf now! This is a topic dear to my heart. It’s my hope that all young girls realise their creative potential (and are ‘proud’ of it, too!). It’s one of the reasons we include in our magazine, ways to use creativity and imagination!

Thursday, 12 January 2017

Easy 3-step lace painted bottle

This is actually bit of a sneak-peak into our next issue! I wanted to do these as a prop for an upcoming photo shoot for our first issue for 2017. The weather has been super hot here, but today it was a little cooler, so my young PA (my little miss!) and I got outside this afternoon and had fun making a bunch of these! In fact, she made more of them than I did! We loved being able to be outside doing something crafty together.

 In just 3 simple steps, you can have these decorating your room, window, even trees!

1 Hang an empty, clean bottle outside - we hung ours from the swing set! (we just used a glass soft drink bottle)

2 Tape a strip of lace around the bottle. The bigger the holes in the lace, the more paint will end up on your bottle.

3 Spray paint over the lace - not too close, and thin layers at a time so you don't end up with thick paint that wants to drip. We just used a plain white gloss spray paint.

When the paint is dry (which on a day like today, didn't take long!), carefully remove the lace.

If you need to pack them up for storage at all, wrap them up in white tissue paper or an old cloth, as the paint can scratch off.

When you get your next issue, you'll be able to play 'I spy' and see if you can find where we used them!


Wednesday, 11 January 2017

Getting ready to go back to school!

I don't know about other mums, but as a teacher, I think I probably start thinking about going back to school before the previous year even finishes! But for kids, it doesn't usually start until about now! The back-to-school advertising starts and we all begin to think of what we need to get ready for school to return. There's the stationery, the uniform, lunch boxes, school shoes ... the list can seem unending! But what about the things that will help you truly see the year through and your precious girl grow. Here's a back-to-school checklist with a twist.


STATIONERY
While you're thinking of all your stationery needs, consider how you will use them. Use your words to bring joy to others, lift them up, and be a light in your corner of the world. You might even want to consider making some little cards or notepaper to keep in stock.

GRATITUDE
An attitude of gratitude will get you through many experiences that could easily get you down. You might be worried about school starting, how your friends will treat you, or how you'll like your new teacher for the year. Every day, think of something you can be thankful for - even if it is just that the sun is out or you are breathing! Once you start an attitude of gratitude, it will become easier and easier to find the good in your life (and in others!).

DIARY
Oh, yes - where would you be without a diary! I know I can't get by without something to help me keep organised - be it with deadlines, to-do lists or activities. And you'll certainly do better at school with one! But, what would it be like, to plan into your 'schedule' ways to be kind, generous and positive to those around you? It might be a random act of kindness, or a way to give of your time or talents, or a positive activity to do with your friends.

BREAKFAST
You've heard that breakfast is the most important meal of the day - it gives you energy for your day's activities, gets your brain firing and helps you to concentrate. A positive attitude from the start of the day will keep your outlook positive for the rest of the day. I well remember getting up grumpy as a child, and my mum telling me to go back to bed and get out of bed on the right side! So true - being positive from the very start will not only impact me, but everyone I come in contact with. It doesn't mean my day will always be great, but it certainly changes the way I handle it!

LUNCHBOX
Every year we do this - make sure everyone has the right lunchbox for their needs, containers for snacks, water bottles ... But there's more to it than just having the right gear - as a mum, I want to make sure my kids have what they need to eat healthy while they are at school. And as kids grow up, they have more say in their food choices (maybe they even share food with their friends). Healthy food choices are a great habit to develop now - and keep up energy levels and health through the stress of a school year. Lunches should include some slow release foods like sandwiches or rice cakes, something fresh like salad or fruit and have little or no added sugar and high energy snacks like potato chips or lollies.

UNIFORM
Almost inevitably, kids will have outgrown their uniform from the year before. Want something they won't outgrow? Develop a sense of pride in wearing a uniform neatly and smartly, respect for their school and school leaders in wearing a uniform as required, and a habit of looking after clothing with putting uniforms in the wash and hanging up when they're clean (and maybe even knowing where their shoes are each day!). While all of that is great for girls to value, it's also important that those who are special in their lives, help them to realise that it is their inner beauty that makes a difference. Encourage them to wear a smile, wear shoes that lead others in a positive way, and adorn themselves with love and joy.

Happy preparing for school to return! And all the best for a great school year!

Friday, 30 December 2016

Getting ready for 2017!

We're getting all ready for a new year! After much frustration getting images the right size, LOOK! We've updated our blog! I'm loving it's fresh, summery feel.

I think, and if you were to ask the girls they'd agree - the photo shoot for this photo was the best one we've done! It's been such a privilege to see these girls grow into young women over the years, and what a blessing they've been to our magazine.

Be sure to sign up to have updates go straight to your email so you can keep your finger on the pulse here at AMELIA. We have insights into our plans for 2017 as well as an annual, prayerful dedication for AMELIA with our staff and regular contributors.

Thursday, 22 December 2016

12 Days of Christmas - Day 10 - Pomander of Spice


Do you have a house full of lanterns glowing their Christmas lights?! Hope you had fun making them. Did you decorate them with pencils or textas?

Today, I have something that I used to make with my mother to hang in the cupboard to keep the moths away and help the clothes to smell nice. They make a great little present, too! You could make them tag-team style – sometimes little fingers get sore!


Here’s how simple it is: tie ribbon around the orange and make a loop for it to hang from. Pin it in place. Poke the cloves into the skin of the orange – all over! You might find you need to pierce the skin with a skewer first.

Some people preserve these with more spices and orris root powder, but as a kid, we never did. Although it won't last for years, it will still be nice and fragrant for a couple of months! I wonder how long Mary kept the presents that the wise men gave Jesus?

These could make a quick and lovely gift, or place them in a bowl on the table to fill the room with its sweet scent! A bit like you, with all the Christmas joy you are bringing to your little corner of the world, sweetening with a beautiful aroma!

Wednesday, 21 December 2016

12 Days of Christmas - Day 9 - Christmas House Lantern

I could imagine that as Mary and Joseph arrived in Bethlehem, there were lights shining from inside all the houses. And, when I think of a traditional, Victorian Christmas, I think of the soft glow of light shining out of those quaint little houses.


So, we couldn’t help but make a cute little house that can shine its Christmas glow!

Simply print off this printable here onto light card, cut out on the cutting line, join the sides and tabs with glue, then glue on the extra decoration!

Pop a little battery-operated tea-light candle inside so it can shine out the windows! You could maybe make a whole row of these little houses, or draw on your own details.


Tuesday, 20 December 2016

12 Days of Christmas - Day 8 - Spicey Wise Men Gift

Seeing the star, the wise men, who had studied the prophecies, set out to find the newborn King. Among their belongings and supplies were gifts to give the King. These were gifts given to those of royal birth. Can you remember what they were? Gold, frankincense and myrrh. Some believe these gifts had special significance: gold for His kingship, frankincense for His priestly role and myrrh for His embalming when He died. The wise men must have been so excited to finally find the King they had searched for. Have you found The King? Are you excited about it? Don’t you want to share that joy with someone else?

We all know what gold is! Frankincense and myrrh are both resins from trees. You might not be able to give these as a gift to someone else, but you can give them a gift of spices!


Put together in a jar:
2 sticks of cinnamon
1 Tablespoon of whole cloves
A few star anise
2 whole nutmeg
Some dried ginger
1 Tablespoon cardamom pods

Spices need to be heated to release their aroma, so to fill your house with the smell of Christmas, place the contents of the jar into a saucepan, cover with water and heat to a simmer.

This would make a great gift – simple and easy!

‘… they went on their way, and the star they had seen when it rose went ahead of them until it stopped over the place where the child was. When they saw the star, they were overjoyed. On coming to the house, they saw the child with his mother Mary, and they bowed down and worshipped him. Then they opened their treasures and presented him with gifts of gold, frankincense and myrrh.’ Matthew 2:9-11

Monday, 19 December 2016

12 Days of Christmas - Day 7 - Gingerbread Man Ornament


Gift-giving doesn’t need to be expensive or something large. I think some of the nicest gives are the ones that are hand-made. Here’s a simple little one that would be easy to make a number of at one time. Great for friends, teachers, Sabbath School leaders or to decorate your Christmas tree with.


Make a batch of your favourite gingerbread recipe and cut out little gingerbread men.


While they’re baking in the oven, get a clear, plastic ornament (you can find some in craft stores, or we picked this one up in the after-Christmas sales last year!). If you have one like ours, carefully cut almost completely around it with a stanley knife (only an adult should do this) – leaving a bit connected to act as a hinge. Glue some string or ribbon to tie it closed with, and then decorate the cut edge on one side.


Use the recipe below to make some royal icing. Place the royal icing in a piping bag, and decorate the gingerbread man – give him a face, some hands and feet, even some buttons!


Once the icing is dry, place a large amount of it in the bottom of the ornament and stand the gingerbread man in it. You may need to hold him there (or prop him up) until the icing is nearly set.


And there you have it! A little gingerbread man gift! And as you give this gift, think of how the wise men brought their gifts to baby Jesus.

Tomorrow, you'll need some whole spices like cinnamon, cloves, star anise, and a jar!

12 Days of Christmas - Day 6 - Movie Night!


It’s become tradition in our home to have a movie night on Saturday night. Last night, though, we were involved in a big Christmas concert so we’re doing it tonight instead! And it’s worked out well – I think I might be rather tired after just getting through the last week of school and a concert!

And, Christmas isn’t Christmas without watching at least ONE soul-lifting, joyful Christmas movie! So, today, why not plan to watch a movie together tonight!

What movie will you watch? The top of my Christmas movie list is always White Christmas and Miracle on 34th Street. After watching them I’m left with a sense of Christmas, maybe some tears (!) and a happy, joyful soul – remembering what Christmas should be about – sharing love and family – not about getting what’s on your Christmas list.

Add a special touch to the night and make some donut popcorn (see recipe below) and spiced hot chocolate (just add a pinch of cinnamon and make the hot chocolate with hot milk instead of water for a smooth, creamy hot chocolate!).


After (or during!) the movie, have a chat about how you can bring those same Christmas feelings of joy to those around you. Jesus was born to bring joy – to show us the wonders of heaven. Share the joy around this Christmas.

'I have told you this so that my joy may be in you and that your joy may be complete.' John 15:11

12 Days of Christmas - Day Five - The Christmas Story

You can’t possibly go through Christmas without reading the story of the first, most wonderful Christmas, when Jesus was born! I don’t know about you, but it gets me teary every time I read it!

So, snuggle up with your precious girl and have a read. You could take turns reading, or let her pick a person in the story and read what they said while you narrate the rest. Really try to imagine what it was like back then, think about what might have been happening in heaven (how joyous those angels would have been!).

The story is found in Matthew 1:18-2:12 and Luke 2:1-20. Or find a book that tells the story with beautiful pictures.

Talk about it afterwards. What does the story change in your life? How does it make you feel?

‘For to us a child is born, to us a son is given … And He will be called Wonderful Counsellor, Mighty God, Everlasting Father, Prince of Peace.’ Isaiah 9:6

Friday, 16 December 2016

12 Days of Christmas - Day 4 - RANDOM ACTS OF CHRISTMAS

Are you ready to bring a Christmas spirit to your little corner of your neighbourhood?! Today’s activity isn’t a craft – it’s a random act of Christmas! Here are some ideas, or you might come up with some ideas of your own!


Thursday, 15 December 2016

12 Days of Christmas - Day 3 - Snowflake Pom Pom


How did your snowflakes turn out yesterday? What have you done with them? Did you save some for today?
Today, we’re going to turn some of those lovely snowflakes into a pom-pom. And it’s so easy you’ll be making piles of them in no time! And, having great mummy-daughter time together – there’s something about busy hands in company that makes way for comfortable deep and meaningfuls!

  • All you need to do for your pom-pom is make two stacks of six snowflakes.
  • Push a split pin through the centre of one stack and spread it open about halfway on the back of the stack. Do the same with the other stack.
  • Starting at the top of one stack, pull the first snowflake up gently and give it a bit of a squeeze around the centre. Pull up the second snowflake and do the same, but don’t squeeze quite so tight. Then do the same for the third.
  • Flip the stack over and repeat for the remaining 3 snowflakes.
  • Do that all again with the second stack.
  • Now, imagine you are going to create a cross-shape with the two stacks (with them turned on their sides).
  • Tie some string around the split pin in the middle of one stack, then around the split pin of the other stack. Leave the tail of string to use for hanging.
  • Fluff out the snowflakes so the pom-pom looks like a ball.
Isn’t it pretty?! And just think, each one of the snowflakes there is beautiful just because there is not another single one like it!

There’s a splendour in this collection of unique snowflakes, that reminds me of groups of friends, or families or communities. Each snowflake is important in bringing its unique qualities to add to the beauty of the group. Much the same way that you do.

God loves you so much He made you unique. And He wants to see your beauty shine out when you are with others. Could your Christmas present to God this year, be you shining your individual uniqueness, adding to the beauty around you, to make the world a brighter place?

Wednesday, 14 December 2016

12 Days of Christmas - Day Two - PAPER SNOWFLAKES


Do you remember doing these? There are just some things that are so simple, yet are still fun to do years later, and this is one of them!
  • Take a piece of paper cut into a square.
  • Fold it in half, then like a pie slice into thirds (this gives a true snowflake look!). Then in half again.
  • Cut shapes out of the folded edges – keeping in mind that you are cutting out only half of the shape.
  • Open it out, and there you have it! A beautiful, unique snowflake!
Pretty it up with a touch of glitter or glitter glue on the edges.
Fill a window with them taped to the glass (or use blu-tac), or hang them from your ceiling!
Here’s a hint: save some for tomorrow, as well – you’ll need at least 12 the same size!
Did you know that each snowflake is unique. There is not one that is the same as the other. So, why does God love you so much that He would send Jesus to be born here that first Christmas? One reason is that He made you. He made you as the only one of you ever to exist. And He has made you for a reason. Be that reason this Christmas. Put your passions, interests and talents to the best use you can. Others will see that spark in you and you’ll make a Christmas difference in the world around you!
'For you created my inmost being; you knit me together in my mother's womb. I praise you because I am fearfully and wonderfully made!' Psalm 139:13,14

Tuesday, 13 December 2016

12 Days of Christmas - Day One- Washi Tape Card

'I'm dreamin' of a white Christmas, with every Christmas card I write ...' It's one of those classic Christmas songs, isn't it? I love it!  And it's so true - we associate Christmas with cards. Here's a simple start to our 12 Days of Christmas - a little washi tape card!


Take some cardboard and cut to size. You could make a flat card, or a folded one.

Cut a strip of washi tape and trim one end as you would trim the end of a ribbon, with a little 'v'.

Place the tape on the cardboard - don't worry about it going over the edge.
Add a couple more strips of washi tape.
Trim the washi tape at the edge of the card.

Hot glue buttons on the end of the washi tape strips.

Why not listen to some Christmas music while you're making this. You could make a whole set of cards, ready to use when you think of who to send them to. Use this card to let someone know how much you appreciate them.

Christmas is all about love. It started with God’s love for us. He loved YOU so much, that He did all He could do to make sure YOU can spend eternity with HIM. He gave up His own son, to come and live here. Jesus was born, just like you and me, but He lived out His life showing us just what God is like. He loved all those around Him. And He did all He could do to show that love. Christmas is a celebration of the greatest love we could ever experience.

At Christmas time we make the most of this opportunity to let people know we're thinking of them, or to catch up and let them know what we've been up to. But we can also turn this into a time to bring real heart-joy to someone by telling them how much they mean to us. Share some of the love of Christmas - the love of Jesus, by making someone feel special and cared for.

With your daughter, write a list of people you'd like to share Christmas joy with, and write your newly-made cards to them. You could even pop them in the post - we so rarely receive letters in the mail, it makes it kind of special when we do!

'Dear friends, let us love one another, for love comes from God. Everyone who loves has been born of God and knows God.' 1 John 4:7

Monday, 12 December 2016

12 Days of Christmas Starts Soon!


Planning on joining us for our 12 Days of Christmas? We get started TOMORROW! Simply keep an eye out for a post here on our blog and facebook page. To make sure you don’t miss out, you can subscribe to our blog to have each post emailed to you!


To get ready for tomorrow, you might want to collect some plain cardboard, washi tape (Christmas style if you have some) or ribbon, button, scissors, hot glue and a hole punch.


Set aside some time so you’re not too distracted by other things, keep some table space clear and set up all that you’ll need ahead of time.

It's going to be great, Christmassy fun with the special girl in your life!

Saturday, 8 October 2016

A sticky craft!


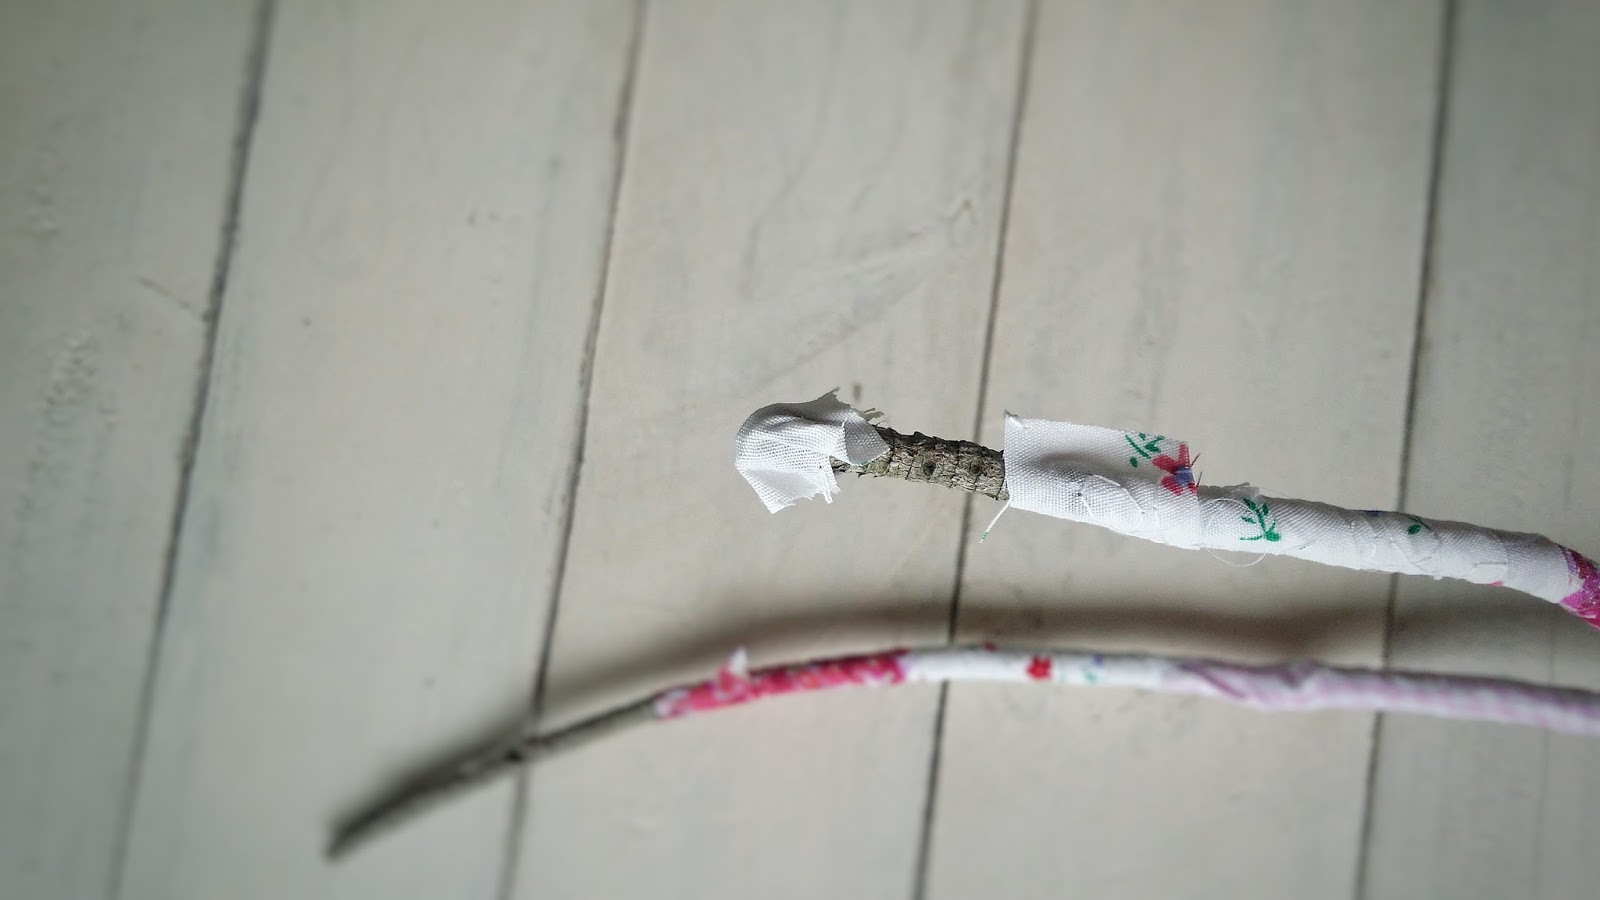
I know, it sounds like the start of a ‘Dad-joke’, but I couldn’t help myself! I had so much fun making some of the 'props' used in our current issue (Spring 2016), that I just had to share how to do them yourself. Here's the first of a few to come!

Sticks and branches can add interest to any room, especially ones that are painted or covered in fabric. Maybe even having extra bits added to them like flowers or leaves, can add an extra touch. Don’t you just love that earthy touch to a room, but like it to look clean and fresh?


Covering a stick with fabric is very easy.

First, pick what fabrics you want to use. Cotton, woven fabrics work best, and they offer a wide range of prints and colour. Choose colours/prints that coordinate well together.

Cut the fabric into strips 2.5 cm wide. They can be a little awkward to use if they are too long (they start to tangle up as you wrap!), so keep them short – no more than about 30-40 cm long.

Begin by dotting the stick with a little hot glue and placing one end of the fabric over the dot, so the fabric will start to wrap on an angle.


Wrap the fabric around the stick, dotting with glue every wrap or two. Overlap the fabric strip about half-way over the previous wrap, so that there is good coverage of the stick and your print/colours show up well.


If you come to a join in the branches, you may need to be a little creative in wrapping to cover all of the stick in fabric.


Keep wrapping until you come nearly to the end of a branch. Cut a short strip of fabric (in the same fabric the outer edge of the branch is covered in), cover the end of the branch with hot glue, and glue the short strip over the end of the branch.


Finish wrapping the branch in fabric and snip off any excess fabric, making sure it is glued down well.


Cover all of the branch/stick with fabric.

To anchor it, attach it to a wall, or if you want it to be more free-standing, place it in a jar filled with pebbles or rice (if the jar is tall and deep, you may need to place the branch in first, then add the pebbles).

You could use your branch to hang things off of, to leave notes on, or to just look pretty in your room!

PS - and if you're young, just remember to be very careful with hot glue, and ask an adult to keep an eye on you while you use it!

Thursday, 6 October 2016

Spring has sprung!

Along with the newness that Spring brings, we have a new issue out!

You're going to love the little unexpected extras throughout this issue, along with the pretty colours and light feel about it!
And, our staff are up to new things, too! Our graphic designer has turned mail-room girl, posting off magazines while I'm overseas. Even my mum has become delivery girl for those few that get dropped off at our church! Thanks, you two.

To subscribe, simply go to the link here. All new subscriptions will receive a copy of each back issue of 2016.