Amelia Magazine Available for Subscription!

Here we come, 2017! It's going to be packed full of great, 'girly' fun, and we hope you'll join us to share in it all!

It's our second year in print and we have loads of fantastic articles, craft, activities and ideas in store for the new year!


Friday, 16 December 2016

12 Days of Christmas - Day 4 - RANDOM ACTS OF CHRISTMAS

Are you ready to bring a Christmas spirit to your little corner of your neighbourhood?! Today’s activity isn’t a craft – it’s a random act of Christmas! Here are some ideas, or you might come up with some ideas of your own!


Thursday, 15 December 2016

12 Days of Christmas - Day 3 - Snowflake Pom Pom


How did your snowflakes turn out yesterday? What have you done with them? Did you save some for today?
Today, we’re going to turn some of those lovely snowflakes into a pom-pom. And it’s so easy you’ll be making piles of them in no time! And, having great mummy-daughter time together – there’s something about busy hands in company that makes way for comfortable deep and meaningfuls!

  • All you need to do for your pom-pom is make two stacks of six snowflakes.
  • Push a split pin through the centre of one stack and spread it open about halfway on the back of the stack. Do the same with the other stack.
  • Starting at the top of one stack, pull the first snowflake up gently and give it a bit of a squeeze around the centre. Pull up the second snowflake and do the same, but don’t squeeze quite so tight. Then do the same for the third.
  • Flip the stack over and repeat for the remaining 3 snowflakes.
  • Do that all again with the second stack.
  • Now, imagine you are going to create a cross-shape with the two stacks (with them turned on their sides).
  • Tie some string around the split pin in the middle of one stack, then around the split pin of the other stack. Leave the tail of string to use for hanging.
  • Fluff out the snowflakes so the pom-pom looks like a ball.
Isn’t it pretty?! And just think, each one of the snowflakes there is beautiful just because there is not another single one like it!

There’s a splendour in this collection of unique snowflakes, that reminds me of groups of friends, or families or communities. Each snowflake is important in bringing its unique qualities to add to the beauty of the group. Much the same way that you do.

God loves you so much He made you unique. And He wants to see your beauty shine out when you are with others. Could your Christmas present to God this year, be you shining your individual uniqueness, adding to the beauty around you, to make the world a brighter place?

Wednesday, 14 December 2016

12 Days of Christmas - Day Two - PAPER SNOWFLAKES


Do you remember doing these? There are just some things that are so simple, yet are still fun to do years later, and this is one of them!
  • Take a piece of paper cut into a square.
  • Fold it in half, then like a pie slice into thirds (this gives a true snowflake look!). Then in half again.
  • Cut shapes out of the folded edges – keeping in mind that you are cutting out only half of the shape.
  • Open it out, and there you have it! A beautiful, unique snowflake!
Pretty it up with a touch of glitter or glitter glue on the edges.
Fill a window with them taped to the glass (or use blu-tac), or hang them from your ceiling!
Here’s a hint: save some for tomorrow, as well – you’ll need at least 12 the same size!
Did you know that each snowflake is unique. There is not one that is the same as the other. So, why does God love you so much that He would send Jesus to be born here that first Christmas? One reason is that He made you. He made you as the only one of you ever to exist. And He has made you for a reason. Be that reason this Christmas. Put your passions, interests and talents to the best use you can. Others will see that spark in you and you’ll make a Christmas difference in the world around you!
'For you created my inmost being; you knit me together in my mother's womb. I praise you because I am fearfully and wonderfully made!' Psalm 139:13,14

Tuesday, 13 December 2016

12 Days of Christmas - Day One- Washi Tape Card

'I'm dreamin' of a white Christmas, with every Christmas card I write ...' It's one of those classic Christmas songs, isn't it? I love it!  And it's so true - we associate Christmas with cards. Here's a simple start to our 12 Days of Christmas - a little washi tape card!


Take some cardboard and cut to size. You could make a flat card, or a folded one.

Cut a strip of washi tape and trim one end as you would trim the end of a ribbon, with a little 'v'.

Place the tape on the cardboard - don't worry about it going over the edge.
Add a couple more strips of washi tape.
Trim the washi tape at the edge of the card.

Hot glue buttons on the end of the washi tape strips.

Why not listen to some Christmas music while you're making this. You could make a whole set of cards, ready to use when you think of who to send them to. Use this card to let someone know how much you appreciate them.

Christmas is all about love. It started with God’s love for us. He loved YOU so much, that He did all He could do to make sure YOU can spend eternity with HIM. He gave up His own son, to come and live here. Jesus was born, just like you and me, but He lived out His life showing us just what God is like. He loved all those around Him. And He did all He could do to show that love. Christmas is a celebration of the greatest love we could ever experience.

At Christmas time we make the most of this opportunity to let people know we're thinking of them, or to catch up and let them know what we've been up to. But we can also turn this into a time to bring real heart-joy to someone by telling them how much they mean to us. Share some of the love of Christmas - the love of Jesus, by making someone feel special and cared for.

With your daughter, write a list of people you'd like to share Christmas joy with, and write your newly-made cards to them. You could even pop them in the post - we so rarely receive letters in the mail, it makes it kind of special when we do!

'Dear friends, let us love one another, for love comes from God. Everyone who loves has been born of God and knows God.' 1 John 4:7

Monday, 12 December 2016

12 Days of Christmas Starts Soon!


Planning on joining us for our 12 Days of Christmas? We get started TOMORROW! Simply keep an eye out for a post here on our blog and facebook page. To make sure you don’t miss out, you can subscribe to our blog to have each post emailed to you!


To get ready for tomorrow, you might want to collect some plain cardboard, washi tape (Christmas style if you have some) or ribbon, button, scissors, hot glue and a hole punch.


Set aside some time so you’re not too distracted by other things, keep some table space clear and set up all that you’ll need ahead of time.

It's going to be great, Christmassy fun with the special girl in your life!

Saturday, 8 October 2016

A sticky craft!


I know, it sounds like the start of a ‘Dad-joke’, but I couldn’t help myself! I had so much fun making some of the 'props' used in our current issue (Spring 2016), that I just had to share how to do them yourself. Here's the first of a few to come!

Sticks and branches can add interest to any room, especially ones that are painted or covered in fabric. Maybe even having extra bits added to them like flowers or leaves, can add an extra touch. Don’t you just love that earthy touch to a room, but like it to look clean and fresh?


Covering a stick with fabric is very easy.

First, pick what fabrics you want to use. Cotton, woven fabrics work best, and they offer a wide range of prints and colour. Choose colours/prints that coordinate well together.

Cut the fabric into strips 2.5 cm wide. They can be a little awkward to use if they are too long (they start to tangle up as you wrap!), so keep them short – no more than about 30-40 cm long.

Begin by dotting the stick with a little hot glue and placing one end of the fabric over the dot, so the fabric will start to wrap on an angle.


Wrap the fabric around the stick, dotting with glue every wrap or two. Overlap the fabric strip about half-way over the previous wrap, so that there is good coverage of the stick and your print/colours show up well.


If you come to a join in the branches, you may need to be a little creative in wrapping to cover all of the stick in fabric.


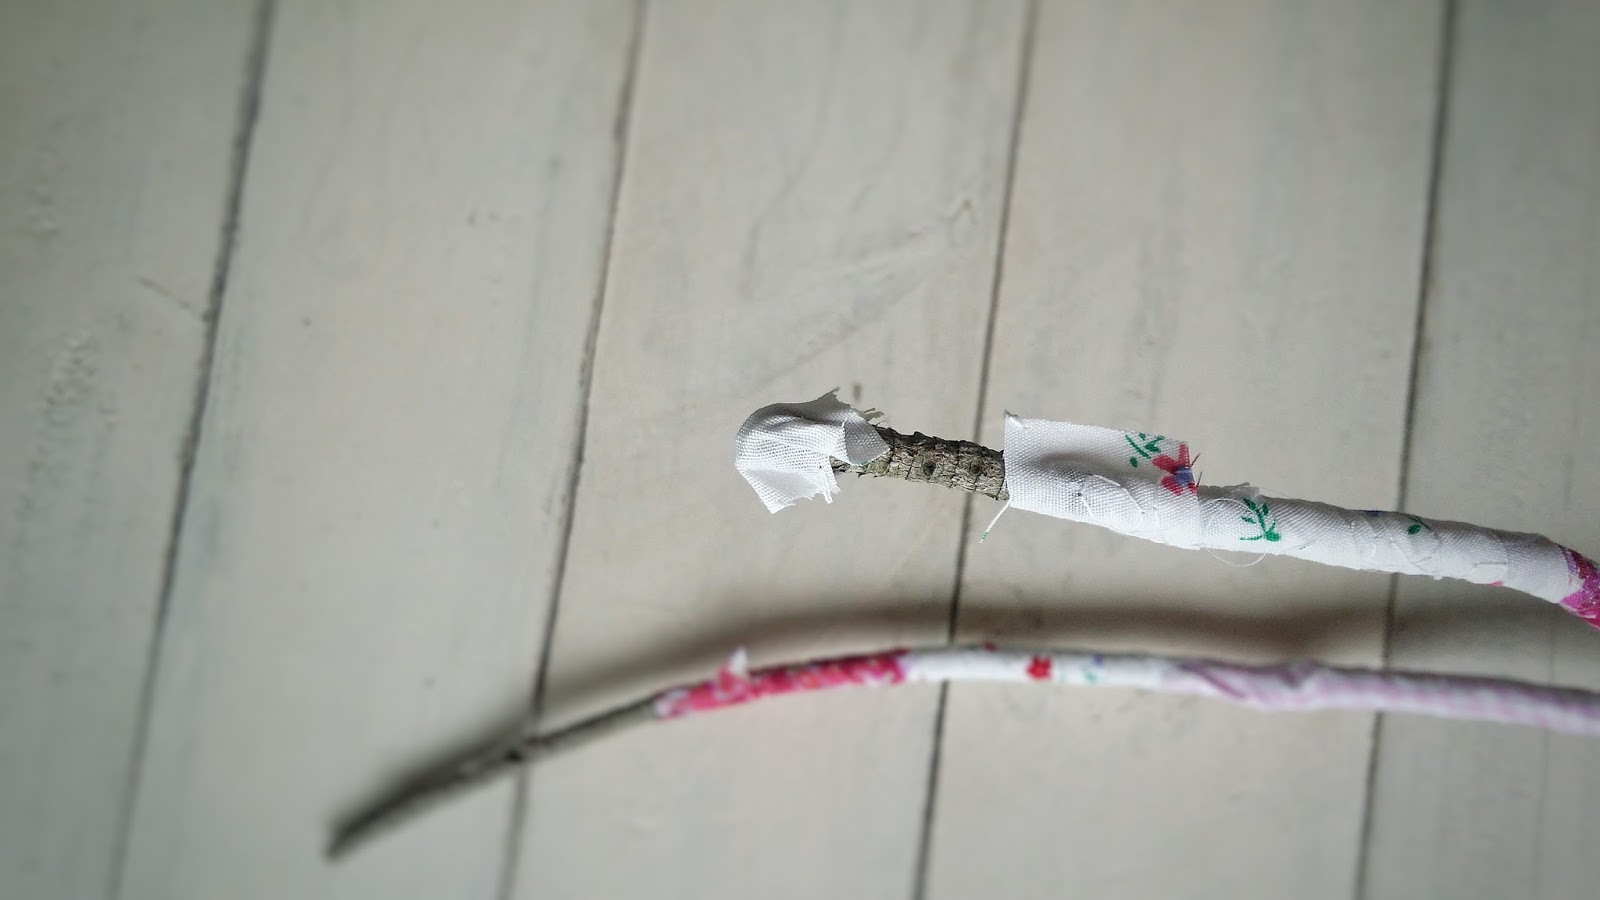
Keep wrapping until you come nearly to the end of a branch. Cut a short strip of fabric (in the same fabric the outer edge of the branch is covered in), cover the end of the branch with hot glue, and glue the short strip over the end of the branch.


Finish wrapping the branch in fabric and snip off any excess fabric, making sure it is glued down well.


Cover all of the branch/stick with fabric.

To anchor it, attach it to a wall, or if you want it to be more free-standing, place it in a jar filled with pebbles or rice (if the jar is tall and deep, you may need to place the branch in first, then add the pebbles).

You could use your branch to hang things off of, to leave notes on, or to just look pretty in your room!

PS - and if you're young, just remember to be very careful with hot glue, and ask an adult to keep an eye on you while you use it!

Thursday, 6 October 2016

Spring has sprung!

Along with the newness that Spring brings, we have a new issue out!

You're going to love the little unexpected extras throughout this issue, along with the pretty colours and light feel about it!
And, our staff are up to new things, too! Our graphic designer has turned mail-room girl, posting off magazines while I'm overseas. Even my mum has become delivery girl for those few that get dropped off at our church! Thanks, you two.

To subscribe, simply go to the link here. All new subscriptions will receive a copy of each back issue of 2016.